Java Installation In Hindi
चलिए दोस्तों आज हम आपको Java के Installation के बारे में पूरी जानकारी देंगे की कैसे java का अपने PC या Laptop में Install कैसे किया जाता है.
कुछ पीसी में जावा पहले से ही Install हो सकता है।
यह check करने के लिए कि जावा के लिए स्टार्ट बार में सर्च करें या Command Promp (cmos.exe) में निचे दी गयी command टाइप करें:
C:\Users\Your Name>java -version
यदि जावा Install है, तो आपको कुछ इस तरह दिखाई देगा.
      java version "11.0.1" 2018-10-16 LTS
      Java(TM) SE Runtime Environment 18.9 (build 11.0.1+13-LTS)
      Java HotSpot(TM) 64-Bit Server VM 18.9 (build 11.0.1+13-LTS, mixed mode)
यदि आपके पास जावा आपके कंप्यूटर पर Install नहीं है, तो आप इसे oracle.com से मुफ्त में डाउनलोड कर सकते हैं। Link निचे दी गयी है.
DOWNLOAD HERE
How To Install In Windows
निचे Step By Step Image की Help से Discribe किया गया है वैसे Follow करे.
Step 1
Go to "System Properties" (Can be found on Control Panel > System and Security > System > Advanced System Settings)
Step 2
Click on the "Environment variables" button under the "Advanced" tab
Step 3
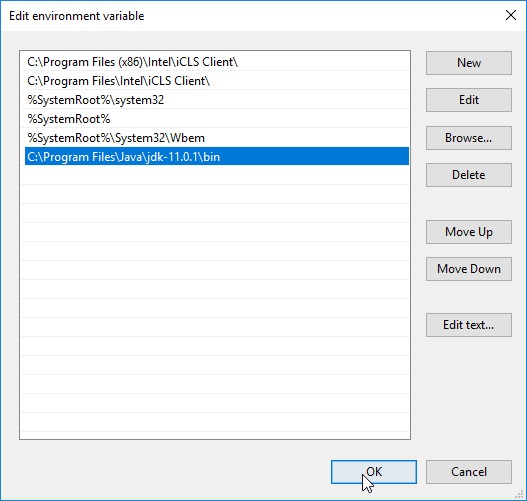
Then, select the "Path" variable in System variables and click on the "Edit" button
Step 4
Click on the "New" button and add the path where Java is installed, followed by \bin. By default, Java is installed in C:\Program Files\Java\jdk-11.0.1 (If nothing else was specified when you installed it).
Step 5
In that case, You will have to add a new path with: C:\Program Files\Java\jdk-11.0.1\bin Then, click "OK", and save the settings At last, open Command Prompt (cmd.exe) and type java -version to see if Java is running on your machine
Write the following in the command line (cmd.exe):
यदि जावा सफलतापूर्वक install किया गया था, तो आपको कुछ इस तरह दिखाई देगा(depending on version):
      java version "11.0.1" 2018-10-16 LTS
      Java(TM) SE Runtime Environment 18.9 (build 11.0.1+13-LTS)
      Java HotSpot(TM) 64-Bit Server VM 18.9 (build 11.0.1+13-LTS, mixed mode)
अब हमने Java को अपनी Machine में सफलतापूर्वक install कर दिया है, चलो अब जावा में अपना पहला Program बनाते हैं।
जावा में, प्रत्येक एप्लिकेशन एक Class नाम से शुरू होता है, और उस Class को Filename से मेल खाना चाहिए।
आइए MyClass.java नामक हमारी पहली जावा फाइल बनाएं, जिसे किसी भी Text Editer (जैसे Notepad) में किया जा सकता है।
File में एक "Hello word" संदेश होना चाहिए:
     public class MyClass
     {
       public static void main(String[] args)
        {
          System.out.println("Hello World");
        }
     }
यदि आप ऊपर दिए गए कोड को नहीं समझते हैं, तो चिंता न करें - हम बाद के Lesssion में इसके बारे में विस्तार से चर्चा करेंगे। अभी के लिए, ऊपर दिए गए कोड को चलाने के तरीके पर ध्यान दें।
Notepad में कोड को "MyClass.java" के रूप में Save। command prompt (cmd.exe) खोलें, उस डायरेक्टरी में जाएँ जहाँ आपने अपनी फ़ाइल Save की थी, और "javac MyClass.ava" टाइप करें:
C:\Users\Your Name>javac MyClass.java
यह आपके कोड को Compile करेगा। यदि Code में कोई Error नहीं है, तो कमांड command prompt आपको अगली Line में ले जाएगा। अब, File चलाने के लिए "जावा MyClass" TypeS करें:
C:\Users\Your Name>java MyClass
output
Hello, Word.
बधाई हो! आपने अपना पहला Java Program लिखा और executed किया है। अगर आपको इस Install Process में कोई भी दिकत आती है तो हमे comment या Contact Form में जाकर हमसे contact करे। .
Thank You.


